Build sophisticated, automated nurture campaigns to segmented lists with the drag-and-drop drip campaign function in Paubox Marketing. Follow the steps below to build drip campaigns.
Table of contents
- Video tutorial: Build a drip campaign
- Create a new drip campaign
- Building a drip campaign
- Activating a drip campaign
- Viewing results
Video tutorial: Build a drip campaign
Creating a new drip campaign
- Go to Drip Campaigns on the left-hand navigation
- Click on Create New Drip Campaign to start building your campaign
Add a starting point
Your starting point or trigger will be the event or activity that starts a contact on your drip campaign. You can choose to send a drip campaign to all contacts on a list or start a drip campaign for any new contacts that are added to a list.
To do that:
- First, give your campaign a unique Drip Campaign ID (aka name)
- Select the type of trigger for the campaign
- Select the list that the drip campaign will send to or create a new list for the campaign
- Press Continue to Drip Campaign Builder to begin building your campaign
Building a drip campaign
Add actions to your drip campaign
Use the drag and drop drip builder to add actions to your drip journey:
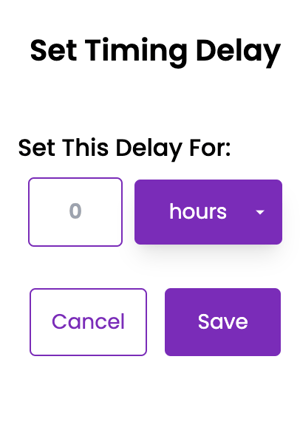
- Set timing delays
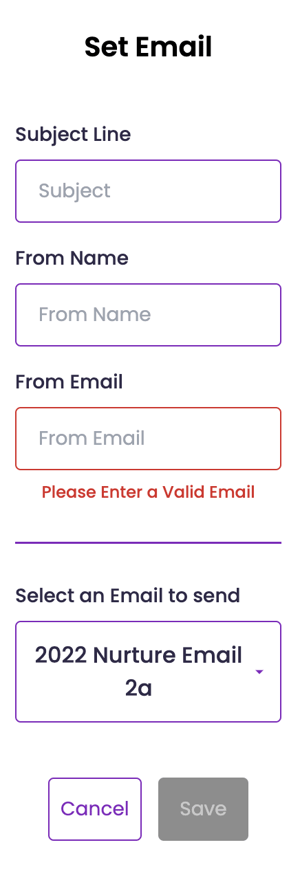
- Add emails
- Add condition branches
When adding a timing delay, set delays for a certain number of hours or days.
When choosing an email, you’ll need to add the subject, from address, and from name. Choose an existing email campaign to send from the drop-down list.
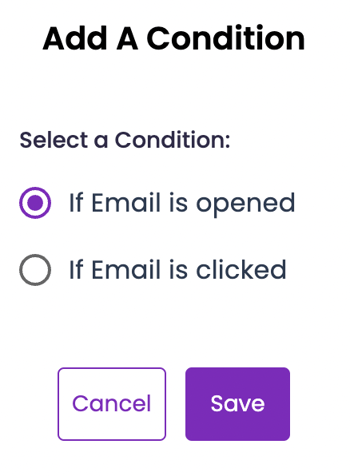
Condition branches can be used to send contacts down a different journey of the drip campaign depending on the conditions that you set. You’ll be able to choose between the following conditions:
- If the previous email is opened
- If a link in the previous email is clicked
Note, for the link clicked condition, this means that any link within the email sent was clicked.
Continue to add actions to your drip campaign to build the contact journey. You may also delete an action in your drip by clicking on the menu button on the action within the builder.

Activating a drip campaign
When you’ve finished building the campaign, press Create. If you make any additional edits, click Save to ensure those edits are saved. Once you’re done building your drip campaign, click on Exit.
From there, you’ll be routed back to the Drip Campaigns page where your new drip campaign is listed as Draft status. Use the menu button to Start Campaign.

Viewing results
After a drip campaign has started, you’ll have options to:
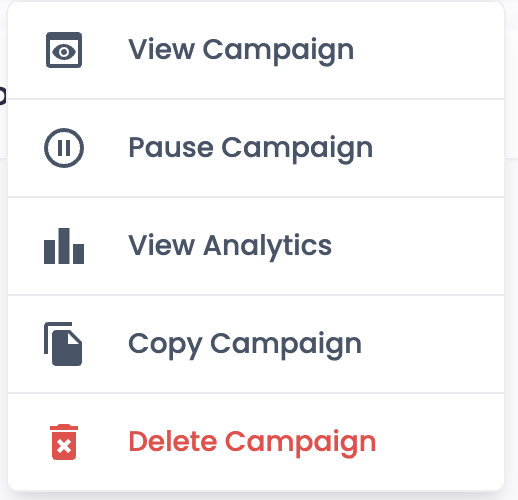
- View Campaign to view your drip workflow
- Pause Campaign to stop the drip campaign at any time
- View Analytics on the menu
- Delete Campaign to permanently delete a drip workflow
Don't have a Paubox Marketing account? Start for free here!